
Hello TimesPix visitors. You know that blogs are the very important source of knowledge sharing tools. Therefore, we forward this page with WordPress tutorial pdf complete guide.
In this section, you will know how to set up a blog using WordPress, the most popular content management system(CMS) using Php and MySQL. If you are a new blogger and want to create a new blog through WordPress, then you are at the right place. Here you will learn to set up a blog within 20 minutes easily.
To set up a WordPress blog you need a web hosting provider and a domain name and the rest thinks are available free if you want to minimize your budget.
In this section you will learn the following main things:
- How to choose and buy a web hosting provider and a suitable domain name for your blog.
- Installation and setup of WordPress in your cPanel.
- How to set up your blog basic settings in WordPress dashboard.
- The basic WordPress plugins you are required to install.
- How to make your website to load past.
- WordPress SEO basic guide.
There are lots of considerations you need to look at while creating a website using WordPress. We analyze the whole tools and frameworks so that you may easily learn how to set up a blog using WordPress.
First step in creating a WordPress Blog
The very first requirement to have a WordPress site is web hosting provider. Web hosting works two tasks:
- It will store all of your website data and all of your coding, files and your database.
- It connects your information to the search engines that you write or share through your blog site.
You will find millions of hosting providers such as Godaddy, Blue host, site ground, WP engine, immotion hosting etc. Most of them are very popular and experience in this field. However, to create a website blog with fast loading speed you need to consider a few things:
First, the type of hosting server you are required for your blog. Most of the websites hosting providers store your data in servers.
As a result , to minimize the cost of running servers they share server resources such as RAM, CPU power etc with lot of sites. It means that around 50 to 300 sites may be running from the same hosting servers. Hosting servers are like your computers running 24 x 7 days a week. Here are a few choices for hosting types:
a. Share Hosting
b. Virtual private server hosting (VPS)
c. Dedicated server hosting
d. Cloud Hosting
Among the poor hosting types, the selection is depending on the number of visitors at the time. If you are a new blogger and just starting your blog, then it is better to go with share hosting. Share hostings are less expensive and best for limited budget sites. I personally recommend to go with blue host or immotion hosting services. This site is hosting by immotion hosting and they have lots of plans which are reliable services with uptime 99.99%
Selecting a domain
If we suppose that web hosting is your home and we can say that domain is your name. If a person looking for you, then they have to visit your home. Selecting a domain is not easy. You may easily by a domain from most of the hosting providers but I personally prefer Godaddy or blue host for buying a domain.
There are two options to choose a domain:
- First you can define a new name for your domain which must be unique and should not be already taken by other.
- Secondly, you may go for buying a auction domain which is previously sold to other and now he is selling in the market. You may also looking for expired domains which means that someone is previously using them for a period of time and now they are not in use.
Whatever the option you want to choose, the key point is a new domain is like a stranger who needs some time to create his reputation so that any search engine like Google may rely on him. The next important point is that the domain you buy or an expired domain-it should be higher authority means trust by search engines. The domain name cost you around $ 10-$ 15. These are the two paid options which you have to spend money for a blog. Here, in this section of WordPress tutorial pdf, next we will discuss signup process of web hosting.
How to Sign up Web Hosting
First of all, you need to visit a web hosting provider site. For example purpose we are using bluehost.com signup process. The benefit of blue host is that they provide a free domain with their hosting plans.

Signup Process

Step 1:
Visit bluehost.com and select a hosting solution. Click on the ‘Get Started Now’ button.

Step 2
Next step is to select a plan for your website and click ‘select’ button.
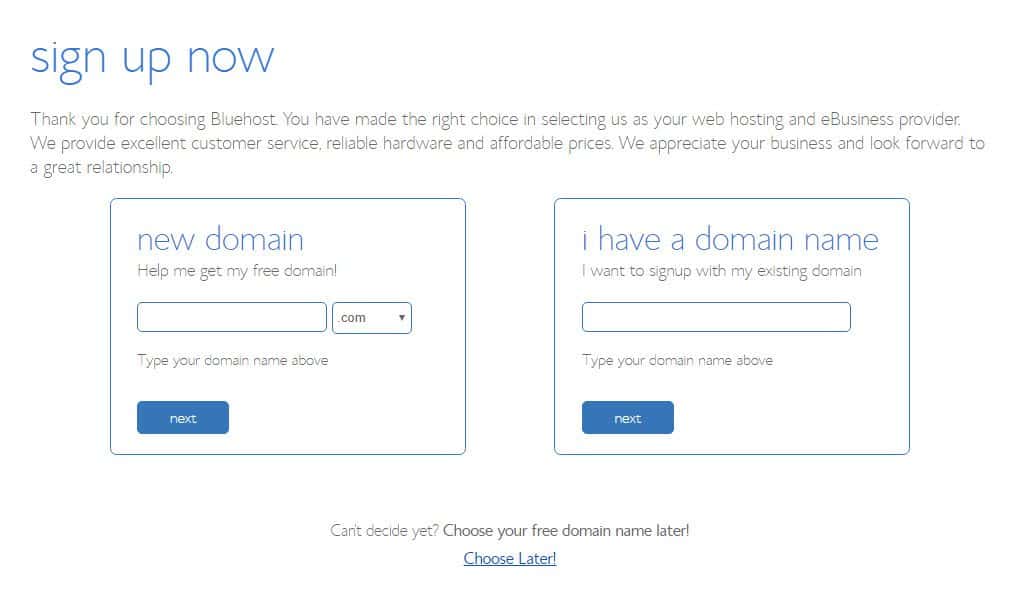
Now you need to type a name of unique domain name that is available for registration. Otherwise, you may use any domain that you already have. You may also choose your free domain name later and click next.
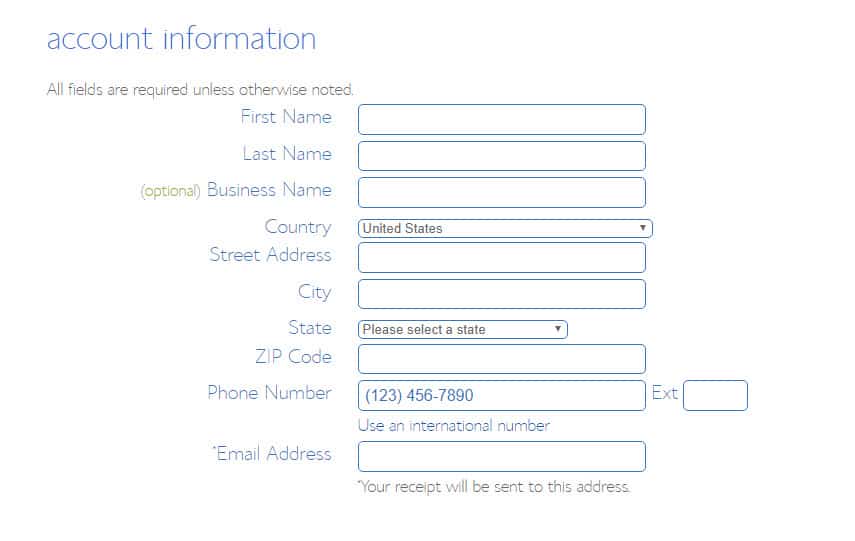
Final Step:
In the final step, you need to enter your details information : your name, country, address details, your email address, phone number etc.
You also need to select your package details; means the period of time you want to register your hosting say 12, 24,36 months etc. In the last part, you need to enter your payment details to pay for the packages.
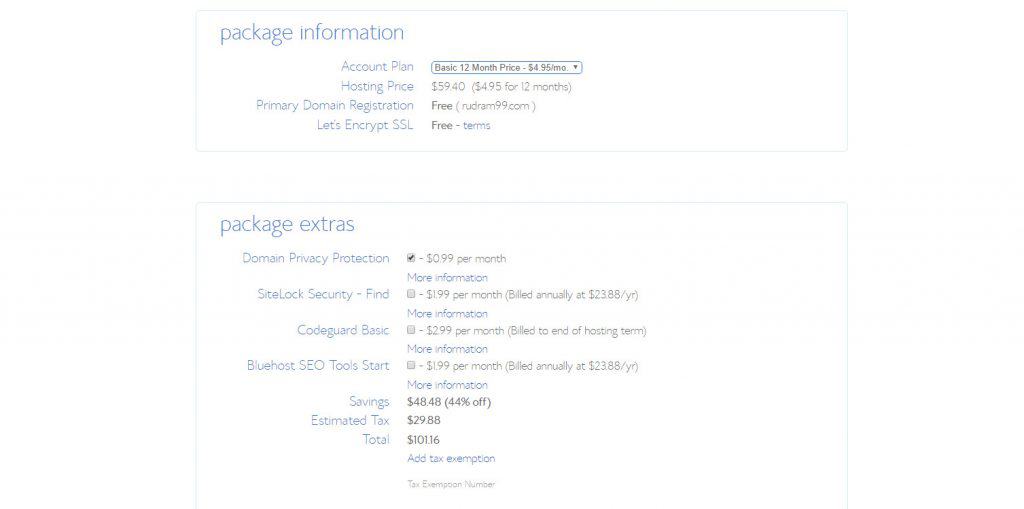
If you want to keep your registration details secretly, select privacy protection plan $ 0.99 per month. That’s it. Now you are able to register your domain and web hosting packages in blue host.
How to install WordPress in blue host:
In this WordPress tutorial pdf, next we are going to discuss installation process of WordPress in blue host. In WordPress plan with a free domain, blue host will automatically install WordPress. However, you will see a notification: ‘coming soon page’. The WordPress is is not in active mode and you need to set up your WordPress site. You need to land sector blue host dashboard account.
In the Control Panel, just go to ‘My Sites’ button on the left. Here you can login to your existing WordPress site or you may also create a new blog Create Site button.
Another way of creating a website is by going to marketplace> marketplace home and click on add website button. Here, you need to enter your website name and little tagline of your site information. Click on ‘Next’ button. Now you need to select your domain name and optionally you may install WordPress in domain subdirectory. Otherwise, leave it blank and click on next button.
This will install WordPress on blue host a panel. Now you can login to your WordPress dashboard.
How to install WordPress using cPanel:
First of all, you need to go to cPanel after logging to blue host admin account.
Now go to ‘website’ section in cPanel and click on install WordPress. Now you have to select your domain name or any subdirectory of the domain if you want to install it there.

Click on Next button and share your have to enter your site title/name, username, admin email address, and a strong password.
Consequently , it may take a few minutes. After that, a information that your installation was successful will show. That’s it. You can now log into your WordPress admin area by going visiting: https://domain/wp-admin/ links. Next, you need a good seo friendly wordpress theme and need customization of your theme.
Now share your site in your social media profile such as Facebook status or in your FB status.

You can download the whole WordPress tutorial pdf guide here
Related posts:
 Secrets That You Must Know About Divi Vs. Elementor: Choose the best WordPress Page Builder plugin
 What is WordPress? wordpress.com Vs wordpress.org – What is the Difference
 Best Affiliate programs for Beginners that you may start earning from a week in 2020
 Top WordPress Interview Questions you Must Know: Easy Tips and Answer